My daughter and I collected seashells every time we went to the ocean but they simply sat in a bucket for a long, long time. We recently moved to a different house and my living room has an African theme. I decided that I wanted to “do something” with the seashells so I made a 3 foot seashell giraffe. Here’s how I did it:
1. Cut out a paper template the size and shape I wanted
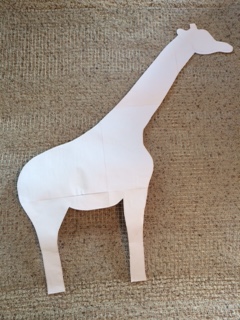
2. Took a large roll of chicken wire and cut it out in the shape of my template

3. Then I layered the templates to get them ready for assembly.
- On the bottom I put my paper template (so I could visually see the shape better).
- On top of the paper template, I put the wax paper – this was so I could use as much glue as needed without worrying about it leaking through to my carpet.
- I put the chicken wire on top of the wax paper and then I was ready to get started.

4. I started by gluing shells around the outside edge of my image. I then just continued filling it in until all of the chicken wire was covered. I used smaller shells and/or broken shell pieces to fill in the small gaps to ensure the wire was completely covered.

5. Once completed and I let it dry for 24 hours, I cut single pieces of wire and looped through the back of the chicken wire to make hangers for hanging. Because the weight was quite heavy, I had to put a hanger on the back AND on the neck. Also, once I had it hung, I put a few screws in between some of the shells to mount it tightly to the wall.


A few tips:
- If I were to do something this large again, I would probably stabilize it on wood or something a little heavier. Although the chicken wire worked well for gluing everything together, it wasn’t as sturdy as I had hoped once I had the weight of the shells on it.
- I tried several different kinds of glue and the one that worked the absolute best was Loctite All-Purpose Adhesive. It is pretty smelly but it tries clear and held great!
- After everything has dried for at least 24 hours, I turned it over and put additional glue on the back side in the cracks to provide additional support and let that dry again for another 24 hours.
